Saturday, 22 October 2011

Playing with Scrap

We visited our local scrap store 'Scrap Magic!' this week and came home with an interesting array of 'intelligent materials' to explore and play with.  They have a great set up where you can fill a basket with reclaimed and recycled scrap materials for £1.50.  We got pieces of rubber, paper clips, a wooden box, bottle lids, a bag of fabric pieces, a bag of wool, pieces of plastic, lengths of coloured cellophane and shiny paper, film canisters, large plastic spools, telephone bits and some tile pieces.
We explored the objects and materials together and I let the children do what they wanted with them.
They made little tables and stools using the spools, plastic lids and film canisters.
Then they wanted to arrange bottle lids and rubber bits on top.
Boy enjoyed turning a small sheet of tiles into a telescope!
The paper clips were also popular and we got out a magnet and played with them using that.  See if you have a scrap store near you and go and explore what you can use with your children.  This kind of stuff has so many open ended play and craft opportunities and the children found it fascinating.

Saturday, 8 October 2011

Prehistoric Imaginary Play Kit

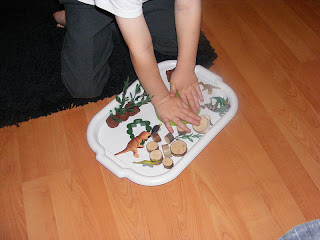
Another young friend's birthday meant a new homemade imaginary play kit earlier this week.  We had plenty of left over bits and pieces so we made a kit for Boy as well.  This kit includes green and brown play dough, a tree cutter, mini dinosaur toys, plastic leaves (from the aquatics dept at The Range), a dinosaur story, and some small wooden logs.
Boy was very excited by the idea of this 'dinosaur dough.'  We put it onto a small tray and he sat down one evening this week with it.
First he made bases for some 'trees' using the plastic leaves.
Then he used the dinosaurs to make prints in the dough.
Then he made this small world scene using all the resources on the tray.
We're looking forward to getting this kit out again later this week.  We may make some extra dough to go with it so the play can be extended a bit.

Wednesday, 5 October 2011

Make a Harvest Loaf

It's Harvest Festival at Boy's school tomorrow.  He was ken for us to make a Harvest Loaf to take in as I had made one earlier in the week for the toddler group Harvest morning.  Once you get going it's actually very simple and something children can help with.
Ingredients: 750g strong white flour, 21g instant yeast, 3 tsp salt, 30ml olive oil.  Put all the ingredients into a bowl and add 360ml water.  Mix with your hands for about 3 mins.  Then add a further 120ml water and mix for another couple of minutes.  You will have quite a wet dough.  Turn onto a floured surface and knead for 5-7 mins until the dough is smooth on the surface and feels quite elastic.  Put it back into the bowl, cover and leave for an hour.
Once the dough has doubled in size knead it again for about a minute.  You are now ready to shape it.
First make lots of quite thin wiggly worm shapes.  These will be the stalks of the corn.  Arrange them onto the baking sheet so they are piled up into a bunch.
Then we made some quite fat sausage shapes for the ears of corn and arranged these at one end of the stalks.
Then we made a plait to represent rope tying the corn together.
Then placed the rope around the loaf.
Then we used a pair of scissors to snip into the ears of corn.
It's traditional to put a mouse onto the loaf so show that the harvest was plentiful and that there was spare corn to feed the mice.  We made ours from a ball of dough, a long strip for the tail and two tiny ball for ears.  The eyes are peppercorns.
Then turn the oven on to 180 degrees.  Cover the loaf.  When the oven is hot brush beaten egg all over the loaf.
Then bake for 30-35 mins until it is a lovely golden brown colour.
This is a very traditional loaf to make.  Farmers used to use the first of their harvest to make loaves and donate them to the church in the past but today you will sometimes see loaves like this one being used to decorate churches and schools as part of their harvest display.  Happy Harvest!

Sunday, 2 October 2011

Mirror Fun!

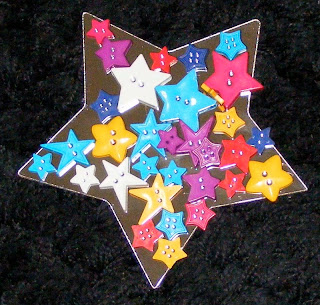
I am planning a science and technology event for the families and children I work with at Little Champions in November.  I've been dreaming up activities and exhibits and this weekend we went to buy some resources.  One of things I've been planning is some mirror play.  I got a set of 4 star shaped acrylic mirrors (four different sizes) for £3.49 at The Range.  I also bought these colourful star shaped buttons for £1.25 from The Sewing Box at Halifax Borough Market.  Boy was very interested in these items and so I agreed he could test drive them!
He began using the buttons to make a pattern on the surface of the mirror.  High levels of engagement and concentration here!
At this point he wasn't interested in selecting different buttons for any purpose.  He wanted to fit all of them onto the mirror as close to each other as possible.  He finished and said 'look it's a jungle!'
 Placing objects onto the surface of a mirror gives a really aesthetically pleasing result.  It also gives children the opportunity to explore reflection.  I plan to get some rectangular mirrors and tape two together and then stand them up so that you can see reflections in more directions.  I had a go myself and Boy took some pictures of me.
Here's my design.
He noticed that I had been selective about the buttons I had chosen and he did the same.  He decided to only use blue and white buttons at first and then asked if we had any more buttons.  I got my box of spare buttons out and he chose some wooden ones from there to use as well.
I asked him if he enjoyed this and he said 'yes because I'm in the pattern, behind it and I like that!'  I really enjoyed doing this too and it was a great way of getting a child to really think and concentrate as it is so fascinating.