Pages

Monday, 5 December 2011

Make a Christmas Cake

Everything's ready it's time to bake a most spectacular Christmas cake
Currants, raisins, sugar and spice will make it ever so nice
Cherries and nuts and almond paste,
These will give it a Christmas taste,
Everyone in the family must stir it twice!

A simple song I learned when I did my teaching practice several years ago and I always remember it when we make ours.  Boy and I have done this together for the last three years, since he was 2 years old.  I use a recipe which is a slight adaptation of Delia Smith's Rich Fruit Cake recipe from her excellent book 'Complete Cookery Course.'  Here's the recipe:

800g mixed dried fruit and peel
50g glace cherries (rinsed and chopped)
3 tablespoons brandy (optional - you can use cold tea if you prefer)
225g plain flour
1/2 tsp salt
1/4 tsp grated nutmeg
1/2 tsp mixed spice
225g butter
225g soft brown sugar
4 large eggs
50g chopped almonds
1 dessert spoon black treacle
grated rind of 1 orange and 1 lemon

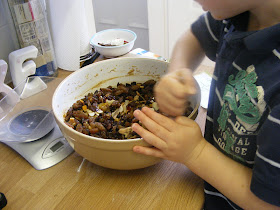
The day before, weigh out all the fruit and mix in the brandy.  Allow to soak overnight.  Grease and line an 20cm round cake tin.
Cream the butter and sugar by beating together until light and fluffy.
Then add the eggs one at a time and beat into the mixture well.
Then once all the eggs have been added you can fold in the flour, salt and spices a few spoonfuls at a time.
Then you can add all the remaining ingredients and mix gently.  Then spoon into the tin.
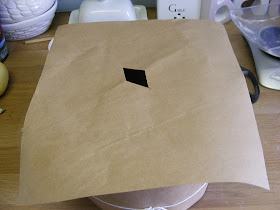
You will need to protect the cake with a strip of brown paper or newspaper round the outside of the tin and then some paper over the top with a small hole to allow steam to escape.
Bake in the oven at 140 degrees/Gas 1 for between 1 1/2 - 2 1/2 hours until the cake is a deep brown colour and is cooked through.
Once it is cooler you can take it out of the tin and let it cool completely.  Then wrap it in layers of greaseproof paper and tin foil and put it in the cupboard for a few weeks to mature before you decorate it.  Another post in a couple of week to show you how we decorate ours.

Thursday, 1 December 2011

Frosty Paper Plates

Boy had a day at home on Wed and we decided not to waste the day.  He spent 1 1/2 hours decorating paper plates with a winter theme.  Girl joined in too, as did I.  I put a selection of cookie cutters in wintery shapes out along with blue and white paints, glitter paint, and some bubble wrap for printing with.
Girl enjoyed sploshing paint and glitter all over her plates.  Boy went for more sophisticated designs using the cutters.  He put down layers of blue paint and glitter and then used the cutters to put white shapes over the top.
Then he filled in the shapes with paint.
Some good painting and fine motor skills developing here.  The bubble wrap was fun to print with and made a lovely snowy effect against a blue background.
These would look lovely hung up somewhere as Christmas decorations.
As the activity went on we talked about wintery weather, ice and snow.  Later on we read 'The Gruffalo's Child' and boy read one of his reading books called 'The Snowman' from the Biff, Chip and Kipper series.  We played some more with our snow dough (will post about that at a later date).

Sunday, 27 November 2011

Snow Dough and Stick Man

I have not posted for quite some time.  My time has been taken up with other things lately and the blog has fallen down my to do list somewhat.  In spite of that we have still been doing lots of things both at home and at nursery but I have just not got round to writing about them.

Anyway here is an activity I've prepared for our toddler group.  We have spent the past two weeks looking at the ever popular 'The Gruffalo' and 'The gruffalo's Child.'  This week is the turn of 'Stick Man.'  Tomorrow we will be reading the story with the children and I have made some 'snow dough' for them to play with.  I simply added white paint and some silver glitter to my usual dough recipe.  I must confess the dough has a slightly different texture to normal, more spongy but still workable.
I made some stick men using twigs.  I stuck googly eyes on them and painted a nose and mouth with paint.  Plenty of wintery cookie cutters and the children can create whatever they want to.

You could adapt this activity and get the children to make their own stick men for small world imaginary play.  This is one of Girl's favourite stories so I'm hoping she'll really enjoy what we have planned for tomorrow!

Saturday, 22 October 2011

Playing with Scrap

We visited our local scrap store 'Scrap Magic!' this week and came home with an interesting array of 'intelligent materials' to explore and play with.  They have a great set up where you can fill a basket with reclaimed and recycled scrap materials for £1.50.  We got pieces of rubber, paper clips, a wooden box, bottle lids, a bag of fabric pieces, a bag of wool, pieces of plastic, lengths of coloured cellophane and shiny paper, film canisters, large plastic spools, telephone bits and some tile pieces.
We explored the objects and materials together and I let the children do what they wanted with them.
They made little tables and stools using the spools, plastic lids and film canisters.
Then they wanted to arrange bottle lids and rubber bits on top.
Boy enjoyed turning a small sheet of tiles into a telescope!
The paper clips were also popular and we got out a magnet and played with them using that.  See if you have a scrap store near you and go and explore what you can use with your children.  This kind of stuff has so many open ended play and craft opportunities and the children found it fascinating.

Saturday, 8 October 2011

Prehistoric Imaginary Play Kit

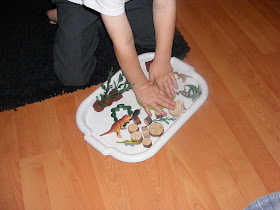
Another young friend's birthday meant a new homemade imaginary play kit earlier this week.  We had plenty of left over bits and pieces so we made a kit for Boy as well.  This kit includes green and brown play dough, a tree cutter, mini dinosaur toys, plastic leaves (from the aquatics dept at The Range), a dinosaur story, and some small wooden logs.
Boy was very excited by the idea of this 'dinosaur dough.'  We put it onto a small tray and he sat down one evening this week with it.
First he made bases for some 'trees' using the plastic leaves.
Then he used the dinosaurs to make prints in the dough.
Then he made this small world scene using all the resources on the tray.
We're looking forward to getting this kit out again later this week.  We may make some extra dough to go with it so the play can be extended a bit.

Wednesday, 5 October 2011

Make a Harvest Loaf

It's Harvest Festival at Boy's school tomorrow.  He was ken for us to make a Harvest Loaf to take in as I had made one earlier in the week for the toddler group Harvest morning.  Once you get going it's actually very simple and something children can help with.
Ingredients: 750g strong white flour, 21g instant yeast, 3 tsp salt, 30ml olive oil.  Put all the ingredients into a bowl and add 360ml water.  Mix with your hands for about 3 mins.  Then add a further 120ml water and mix for another couple of minutes.  You will have quite a wet dough.  Turn onto a floured surface and knead for 5-7 mins until the dough is smooth on the surface and feels quite elastic.  Put it back into the bowl, cover and leave for an hour.
Once the dough has doubled in size knead it again for about a minute.  You are now ready to shape it.
First make lots of quite thin wiggly worm shapes.  These will be the stalks of the corn.  Arrange them onto the baking sheet so they are piled up into a bunch.
Then we made some quite fat sausage shapes for the ears of corn and arranged these at one end of the stalks.
Then we made a plait to represent rope tying the corn together.
Then placed the rope around the loaf.
Then we used a pair of scissors to snip into the ears of corn.
It's traditional to put a mouse onto the loaf so show that the harvest was plentiful and that there was spare corn to feed the mice.  We made ours from a ball of dough, a long strip for the tail and two tiny ball for ears.  The eyes are peppercorns.
Then turn the oven on to 180 degrees.  Cover the loaf.  When the oven is hot brush beaten egg all over the loaf.
Then bake for 30-35 mins until it is a lovely golden brown colour.
This is a very traditional loaf to make.  Farmers used to use the first of their harvest to make loaves and donate them to the church in the past but today you will sometimes see loaves like this one being used to decorate churches and schools as part of their harvest display.  Happy Harvest!

Sunday, 2 October 2011

Mirror Fun!

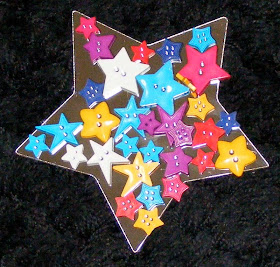
I am planning a science and technology event for the families and children I work with at Little Champions in November.  I've been dreaming up activities and exhibits and this weekend we went to buy some resources.  One of things I've been planning is some mirror play.  I got a set of 4 star shaped acrylic mirrors (four different sizes) for £3.49 at The Range.  I also bought these colourful star shaped buttons for £1.25 from The Sewing Box at Halifax Borough Market.  Boy was very interested in these items and so I agreed he could test drive them!
He began using the buttons to make a pattern on the surface of the mirror.  High levels of engagement and concentration here!
At this point he wasn't interested in selecting different buttons for any purpose.  He wanted to fit all of them onto the mirror as close to each other as possible.  He finished and said 'look it's a jungle!'
 Placing objects onto the surface of a mirror gives a really aesthetically pleasing result.  It also gives children the opportunity to explore reflection.  I plan to get some rectangular mirrors and tape two together and then stand them up so that you can see reflections in more directions.  I had a go myself and Boy took some pictures of me.
Here's my design.
He noticed that I had been selective about the buttons I had chosen and he did the same.  He decided to only use blue and white buttons at first and then asked if we had any more buttons.  I got my box of spare buttons out and he chose some wooden ones from there to use as well.
I asked him if he enjoyed this and he said 'yes because I'm in the pattern, behind it and I like that!'  I really enjoyed doing this too and it was a great way of getting a child to really think and concentrate as it is so fascinating.

Saturday, 24 September 2011

Sand & Surf Imaginary Play Gift

We have just returned from a friends birthday party so I am now able to share this idea for a birthday gift without it's recipient seeing it before opening it.  I've been thinking about giving some homemade play dough to little friends for their birthday's for a while.  I didn't want to just give the dough on it's own so I put a few different resources together on a 'sea' theme along with the dough.  It's intended to be really open ended with scope for all kinds of play and to encourage creativity and the imagination.  Here's what is included.....
The play dough is blue (added green and silver glitter) and yellow (added gold glitter.)
A boat shaped cookie cutter.
Three small plastic tropical fish.
A selection of seashells.  I also put in a small book about underwater creatures.
Then I made it look attractive by wrapping the items in a cellophane gift bag and putting the dough into a kilner style jar.  A blue ribbon and some blue paper to write a tag and it was finished!  I think it's a lovely idea to put something like this together for a child's present.  There are so many commercial toys on the market but it can be difficult to find something original that children can really explore and get creative with.  I intend to make some similar ones on different themes for some more birthdays coming up.  I'll post these once they're done!